Showing posts with label vanilla. Show all posts

Wednesday, April 24, 2013

Homemade Marshmallow Creme

Sticky, fluffy marshmallow creme — sometimes dubbed marshmallow topping or "cream" — can be whipped together in less time than it takes to make a decent cup of hot chocolate. And then, hey, boom, spike that drink with a little whiskey or something stronger and you've got something to put on top of it.

We've discussed real marshmallow syrup before, using actual and esoteric marshmallow plant, but spooning globs of this fake stuff onto hot chocolate, ice cream, milkshakes, or Sundaes is a lot more familiar to...well, nearly everyone.  Legions of American children grew up eating fluffernutter sandwiches, a combination of peanut butter and marshmallow creme, in their school lunches. Some home cooks deploy it as a binder in puffed rice squares and popcorn balls, to add bulk and sweetness in sauces and fudge, and as the base for cake frostings and whoopie pies.

Here's what most home cooks don't do, though: make it themselves and change the base flavor. Vanilla extract is the common flavoring, but why not use mint extract, rosewater, or orange flower water? Pomegranate molasses adds a bit of color and a pleasant bitter note to the sweetness of the glossy white confection. And don't forget liquor: bourbon, absinthe, apple brandy, and dark rums are just the beginning. Admittedly, absinthe-flavored marshmallow creme may have limited uses, but that cup of hot chocolate is a good place to start.

This marshmallow topping can be cobbled together from just a few ingredients common to both bartenders and moms; syrup, egg whites, confectioners' sugar, a pinch of salt, and some kind of flavoring. If you happen to be making ice cream, you may well have those egg whites on hand already. Some confectioners cook a syrup that's a mix of sugar, water, corn syrup, and cream of tartar. You could tie your shoes with gloves on, too, but why make this harder than it needs to be? Let's drop any pretense of this being at all healthy and use straight corn syrup. See below for notes on flavorings.
Homemade Marshmallow Creme 
2 egg whites
1 cup corn syrup (310g)
1 cup confectioners'/powdered/10x sugar (110g)
1 teaspoon vanilla extract (or other flavoring: see note below)
a knifepoint of salt — no more than 1/8 tsp
In an electric stand mixer (such as a KitchenAid) beat the egg whites and corn syrup with the ballon ship attatchment for a few minutes until the mixture is stiff and white. Stop the mixer. 
Add the powdered sugar in three stages. Add the first third, turn the mixer on low, then increase gradually to the highest speed until all the sugar is incorporated. Turn off the mixer. Add the second third of sugar and repeat until all the sugar is fully incorporated and the mixture is solid white, glossy, and thick enough to hold thick ribbons that plop off a spoon or spatula.
Add vanilla (or other flavoring) and salt and mix until well blended. Transfer to a one-quart container and store covered in the refridgerator; it will keep for up to three days.
A note on flavorings: A half to a full ounce (1-2 tablespoons) of most spirits should suffice (unless they are strongly flavored — use your judgement), a teaspoon of most baking extracts or cocktail bitters, and just a few drops for strong essential oils such as mint or neroli.

Goes well with:

Wednesday, February 6, 2013

Making Vin d'Orange with the Last of the Seville Oranges

Now that winter has hit full stride, the citrus offerings could hardly be better. We’ve been making marmalades, lemon curds, desserts, and cocktails with the aromatic bounty. In the kitchen now, I’ve got 5 kilos of navel oranges, a box of Meyer lemons, a bowl of blood oranges, several dozens each of limes and Eureka lemons, a bowl of bergamots — and three Seville oranges.

Those last three bitter oranges may end up as the base for ice cream or a cake. Maybe syrup. Perhaps a tincture. Not entirely sure. I’ll have it figured out by dinner. The rest of them are soaking in wine.

Unlike relatively sweet Washington or Valencia oranges typical of American supermarkets, the rough-skinned Seville oranges are an older bitter/sour variety with limited availability in the US. Centuries ago, when members of the English and French aristocracies grew trees in their glass-enclosed orangeries, these were the fruits they grew. In Florida today, grocery stores and fruit stands may sell them as sour oranges or naranjas agrias — a core component of Cuban mojo, a ubiquitous (and delicious) marinade. In Spain, most of the bitter orange crop is exported to the UK where it is turned to classic orange marmalade. The dried peels of Caribbean harvests remain the building blocks of numerous famous orange liqueurs.

Lumpy-ass bitter oranges, freshly washed
But it is France, where bitter oranges are known as bigarades, that inspired me this weekend to convert a batch into a simple orange-infused aperitif called vin d’orange. The instructions below may seem proscriptive, but in truth, it’s a flexible recipe with room for adjustments. Do you prefer a drier result? Use less sugar and a drier wine. Like something more full-bodied? Try it with red wine rather than the rosé I used. If white wine is your thing, who’s to stop you from using white? Precedents exist for each. You could even ditch the bitter oranges entirely and make vin de pamplemousse with grapefruit.

By early summer, the wine will have taken on the ethereal taste of vanilla and bitter orange. Balanced with the sweetness of cane sugar, it will be just the thing for our pre-meal drinks outdoors. And, of course, if you want to play with it as an alternate to sweet vermouth or Lillet, you’d be on solid ground.
Vin d’Orange

8-10 Seville oranges (about 1 kilo or 2-2.5lbs) quartered lengthwise and sliced in smallish chunks — peel, pith, seeds, and all
2 entire lemons, sliced similarly
6 (750ml each for a total of 4.5 liters) bottles of cheap but decent rosé wine (see below)
1 liter vodka 80 proof/40% abv
2 vanilla beans, split lengthwise and cut into thirds
700g-1 kilo sugar (1.5-2.2 lbs)

If you have a container large enough to hold 2 gallons, put everything in it. If, like me, you use two smaller jugs, split the ingredients evenly between them.

I'll get to you when I return from Kentucky.
Put all the ingredients into one (or two) jars. Seal, shake. The sugar won't all dissolve at first. Patience; it will over time. Put the jars in a dark spot such as a cabinet, closet, or basement. Give it a shake or two every day for two weeks. Just to show it who's boss. Then every week or so do the same. So it doesn't forget.

After a rest of 30-60 days (I find better extraction at 60 days, but even an hour shows marked improvement on taste and some impatient souls simply can't wait two months), strain the mixture into a large clean bucket, carboy, fermentation tub or what have you. Cover it and let it settle a day, then line a funnel with several layers of cheesecloth and rack the heady wine into the clean bottles you saved, leaving any sediment behind in the bucket.

Done. Label it, date it, store it in a cool, dark place. One bottle should go into that cool, dark place known as the fridge.
Equipment note: You’ll need one or two large glass jars or stainless steel containers for the long infusion. Make sure they are airtight. I used 5-liter glass jugs with swing tops and gasket closures. When the time comes to bottle, you’ll also need clean glass wine bottles. My suggestion: wash and save the ones you emptied into the jugs.

Goes well with:

Thursday, December 30, 2010

Taking a Tiki Shortcut with Simbre Sauce

Last summer, I uncovered a stash of underpriced Zaya Gran Reserva rum in a coastal mom and pop liquor store. I rolled away with a single drink in mind and half the stock in my trunk. This aged rum from Trinidad and Tobago is big-flavored, slightly sweet, and a lot of my friends use it as a sipping rum. In my book, though, Zaya shines as a mixer, especially when it’s one of multiple rums in a drink. In fact, the odd snifter and Mai Tai aside, we’ve used almost all of it mixed in a Depression-era tropical concoction: The Nui Nui.

The drink dates back to the late 1930’s and is credited to legendary self-promoter and tiki forefather Don The Beachcomber. How much do we like the Nui Nui? So much that we’ve downed three bottles of Zaya since this summer — and each drink, the way we make it, calls for only an ounce. The other ingredients are just fruit juices, Appleton rum, and a syrup we’ve dubbed Simbre Sauce.

We came up with Simbre Sauce because of the sheer volume of Nui Nuis we were downing. The sauce has perfectly legitimate non-boozy uses and sometimes gets drizzled on ice cream or yogurt and granola around here. But its real purpose is to cut down the time it takes to make a drink. Rather than pouring the various syrups and tinctures called for in the original recipe every time we wanted a batch, our friend Douglas pre-batched them as a single syrup to streamline the process. I dubbed the result Simbre (SIM-bray) Sauce after an old name in his family.
Simbre Sauce

350ml cinnamon syrup
175ml vanilla syrup
175ml pimento dram (an allspice liqueur)
5ml Angostura bitters

Mix, bottle, and store under refrigeration.
Ingredient notes: I use homemade syrups in the concoction above, but Trader Tiki’s range of tropical syrups make blending something like this a snap. If you do use Trader Tiki syrups, be aware that the cinnamon is strong and you may need to use a little less. This is good: it leaves more to go around. If you want to make your own, add 6 4” cinnamon sticks to 2 cups of water and 2 cups of sugar in a pot, simmer about 2 minutes and allow to cool before straining and bottling.

Trader Tiki himself crafting Nui Nuis
For the pimento dram, unless you're the sort to make your own, use St. Elizabeth Allspice Dram. Eric Seed of Haus Alpenz has been importing the stuff and since I bought my first bottle, I’ve never been without some.

And now, the Whiskey Forge variation of this old tropical drink. It lacks the traditional long orange peel and uses block ice rather than crushed ice. If you want to make one that adheres to the old method, see Kaiser Penguin’s take on it below.
Simbre Nui Nui

3 oz Appleton Estate V/X
1 oz Zaya
1 oz fresh lime juice
1 oz fresh orange juice
1 oz Simbre Sauce

Combine the ingredients in a shaker and shake with ice. Strain into ice-filled mugs. Sip. Smile.
Goes well with:

Tuesday, January 26, 2010

Day Old & Bold: Francis Lam’s Banana Pudding


It takes a little time to develop that flavor
(Day old banana puddin')
To soak it all up with your vanilla wafer

(Day old banana puddin')

So get out your bowl and your wooden spoon

(Day old banana puddin')

'Cause I can smell your pudding clean across this room

(Day old banana puddin')


~ Southern Culture on the Skids
Banana Pudding

A few days ago, in a Facebook thread about a pork shoulder I’d been cooking, banana pudding came up—specifically, a caramel-laced version Francis Lam posted recently. Someone—someone in my own household—declared “We ♥ Francis Lam.”

This is true. We do. What’s also true is that Francis, a friend of friends and erstwhile editor for Gourmet, has disrupted more dinner plans at our house than earthquakes and kitchen accidents combined. After Gourmet disbanded, Francis started writing—and writing and writing—at Salon.com’s food section. I really like his stuff. So much so that dishes I’d planned to make for dinner get shoved aside so I can play with his recipes instead.

Last Friday’s recipe for banana pudding in particular caught my attention. I had a load of bananas I intended to make into a Filipino banana ketchup. Enter Lam, all tatted up and full of loose talk about “Fancy Pants Banana Pudding.” Now, I like this tropical trifle as much as the next guy, but the version he wrote about incorporated a banana-spiked caramel. I was hooked. Ketchup? What ketchup? That’s for another day.

It was time for banana pudding. Click above to see Francis’ original post, but I’ve made some adjustments to the recipe (you know how these things go), so you can compare them if you like.

The result is simply one of the best banana puddings I've ever had. Homemade custard is almost always an improvement over store-bought powder, but the real trick pony here is the banana caramel. It gives deep, sweet, luxurious notes to the whole thing. Next time, I might toss a little rum into the dish (a quick dip of the cookies in, say, a nice Demerara), but for now, all I need is a spoon.
Banana Caramel
2 average to large bananas, very, very ripe (brown spots on skin)
1 cup granulated sugar
½ cup water
  1. In a blender or food processor, puree the bananas fully, until they pour like pancake batter.
  2. Combine sugar and water in a very clean, heavy saucepan. Bring to a boil over high flame, and turn it down to a vigorous simmer. As the water boils off and you're left with pure molten sugar, the bubbles will get bigger but slower and less violent. Nothing will look like it's happening for a while, but keep an eye on it.
  3. When you start seeing some color develop at the bottom, gently swirl the pan to distribute it; this helps the sugar caramelize evenly. Caramel is a game of chicken: Pull the sugar off when it's too lightly colored, and the flavor is one-dimensional. Pull it off when it's too dark and it's burnt, bitter and acrid. But once the color starts to turn, it turns pretty quickly, so you have to be brave but not stupid; only repetition and a good memory for color will tell you when you've got the perfect color. But if you're new to this, play it a little safe and cook and swirl until the sugar is amber-colored and remove it from the heat, still swirling gently.
  4. Pour in the banana puree and stir vigorously with a spoon, heat-proof spatula, or whisk, making sure to dig in the corners of the pan. It'll hiss and sizzle and maybe even boil. Just stick with it and it'll calm down. When it's cooled, give it a taste. Delicious! You will have extra; keep it in the fridge [edit: in fact, you’ll have enough for a double-batch of the pudding below).
Pudding
1 ½ cups whole milk
½ cup heavy whipping cream, plus ½ to 1 cup more for whipping
3 Tbl 25g cornstarch
3 Tbl/45ml cold milk
2 eggs
6 Tbl/80g sugar
¼ tsp salt
2 Tbl/30g unsalted butter, cut in pieces
¼ tsp vanilla extract
½ cup banana caramel (or to taste)
1-2 large, firm bananas (ripe, but still pale yellow)
Nilla wafers (or ginger snaps , ladyfingers, or cookie or cake of your choice)

  1. In a heavy 2-quart pot, heat the 1 ½ cups of milk and the cream just to the point of simmering, lower the heat, and hold it there.
  2. In a medium mixing bowl, whisk together the cornstarch and 3 Tbl cold milk to assure there are no lumps.
  3. In a separate bowl, beat the eggs, sugar, and salt together until light.
  4. Combine with the cornstarch mixture.
  5. Slowly pour—while whisking—about half of the hot milk/cream mix into the egg mixture. This helps to temper the eggs and make sure that the shock of a bunch of hot dairy all at once doesn’t curdle them. Add the remaining hot dairy, and whisk to combine.
  6. Working quickly, clean out the pan used to heat the milk (or just use a clean one), then return the mixture to the clean pan. Stir over medium heat, adding butter bit by bit, until the mixture thickens and coats the back of a spoon.
  7. Once thickened to a loose, well, pudding-like consistency, take off the heat, and pour into a mixing bowl.
  8. Add the vanilla extract.
  9. Fold in the banana caramel (if it’s very cold and thick from the fridge, measure some into a bowl, stir in a cup or so of the warm pudding, then fold this lighter, more malleable mixture back into the pudding).
  10. Assemble the pudding by putting down a layer of cookies in whatever dish you intend to use. Then about a third of the caramel-laced pudding. Then a layer of banana slices (about ¼” thick), then more cookies, then a final layer of the remaining pudding mix.
  11. Cover the top with plastic wrap to keep a skin from forming, and chill in the fridge overnight.
To serve, lash it with whipped cream.

Thursday, December 31, 2009

Liqueur du Grapillon

One of the most important things
that distinguish man from other animals
is that man can get pleasure from drinking
without being thirsty.

~ Fernand Point

Not long ago, I plucked a 1974 copy of Fernand Point’s Ma Gastronomie from the shelf. Point was the French chef/restaurateur of La Pyramide, a renowned temple of gastronomy south of Lyon. I was looking for his recipe for a sort of simple French milk punch. Though he died in 1955, his life and work continue to inspire chefs today. Marc Vetri, for instance, whose restaurant Vetri Mario Batali claimed was possibly the best Italian restaurant on the East Coast, used to keep the same copy of Ma Gastronomie in his kitchen. Thomas Keller, no slouch in the kitchen, has written an introduction to a new edition of the cooking classic and it’s worth tracking down if, like me, you're into food as well as drinks.

The recipe I was hunting (from the oversized yellow-jacketed 1974 edition) is for a homemade liqueur that Point used to take with him as he went to survey the quality and maturity of the grapes of the Côte Rôtie. Reputedly, he would stop now and again on the steep slopes of the vineyards and take a swig of a tasty little pick-me-up he called Liqueur du Grapillon (or “Liqueur for the Grapes”).

The recipe calls for an entire lemon, cut into quarters, to be thrown in with brandy, milk, and vanilla. Citrus and dairy in the same drink can lead to some chewy disasters. They can be—and often are—combined without incident, but keep this formula in mind: [citrus + milk] = [curds + whey]. Fortunately, since the lemon is not squeezed into the mix and, as this mixture sits in the dark for almost two weeks, any curds formed are very small and easily strained out.

The result is a smooth, thick and mildly sweet liqueur, similar to egg nog but not as thick and without the eggy overtones, tasting of whole milk, vanilla, and cognac. After a few days of macerating, I tasted the drink and was leery: the lemon was overpowering, sharp, and biting. Resisting the temptation to yank it out of the jar (after all, presumably Point knew something about successfully combining tastes), I left it in and was rewarded after another week with a mellowed liqueur that no longer tasted like furniture polish.

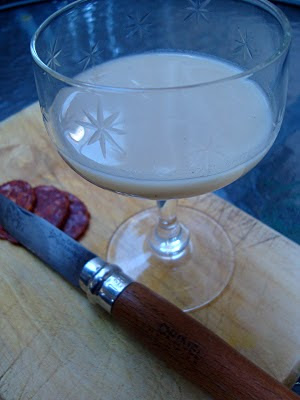
On the last day of the decade, I poured myself a short glass, grabbed some dried sausage and a pocket knife, and moseyed out to the patio to read the paper and soak in the beautiful sun of Southern California. There are no grapes to survey, but the palm trees look mighty fine.

Liqueur du Grapillon
(“Liqueur for the Grapes”)

Combine sixteen ounces of milk, eight ounces of sugar, sixteen ounces of very good eau de vie or brandy and add a lemon cut in thirds and a vanilla bean. Let the mixture stand, stirring from time to time. After 12 days, strain and serve.
~ Fernand Point (1974) Ma Gastronomie. Lyceum Books, Wilton, CT.


Ingredient Notes: I’d used the vanilla pod in this recipe to make vanilla syrup as well as vanilla sugar, so a little bit of its moxie had been spent. To compensate, I used a pod and half, then, at bottling time, squeezed out all the remaining tiny black seeds as if from a tube of toothpaste into the strained liqueur.

For milk, use whole milk, preferably unpasteurized. It really does make a difference. Don't even bother with 1%, 2%, or soy abominations. The brandy I used was Claude Chatelier VS, about $20/750ml at Trader Joe's. If using a waxed lemon, give it a good short scrub in hot water to remove as much of the coating as possible. Pluck it from the backyward if, like me, you live in places where mixers grow on trees.

Secondhand editions of Point's book are still around, but if you want to score the new edition, here's the skinny:

Fernand Point with introduction by Thomas Keller (2008)
Ma Gastronomie
240 pages, hardback
Publisher: Overlook/Rookery
1585679615
$40.00

.

Tuesday, December 1, 2009

Rowley’s Gift Guide for Drinkers: Homemade Vanilla Syrup

In twenty years of cooking my own meals, I have made some flat-out amazing dishes. So far, none has been as delicious as my own homemade vanilla syrup.

If you are inclined to make your Christmas presents, here’s one that drinkers on your gift list should get some miles out of. It’s an integral component to the tropical Nui Nui, lends an ethereal air to a Ramos gin fizz, and in small doses lends a velvet softness to whipped cream for topping Kahlua-spiked hot chocolate.

There are two primary ways of making the syrup at home. One uses high-quality vanilla extract. The other—the one that I feel gives superior results—uses actual vanilla pods. We will take a look at both. First, a quick-and-dirty version that starts with a sugar syrup that I tend to keep around in large quantities.


Quick & Dirty Vanilla Syrup

1 cup 2:1 simple syrup*
1 tsp vanilla extract

Stir the vanilla extract into the syrup and bottle. And Bob’s your uncle: It is now ready for use.

Note: use a high-end vanilla extract or don’t bother making your own syrup. Reputable brands include Penzey’s and Nielsen-Massey Vanillas. I use the heady Mexican brand Orlando Gaya Hijos from Veracruz.

Now, here’s the recipe I use when I don’t need a bunch of syrup immediately. As in Philadelphia-style vanilla ice cream, tiny black seeds are shot throughout.


Rich Vanilla Syrup

2 cups sugar
1 cup filtered water
5 vanilla pods

Pour the sugar and water into a small, heavy saucepan. Slice each vanilla pod along its length and open like a book. Scrape as many of the tiny black seeds as possible into the pot. Using kitchen shears, snip each pod into 1” lengths. Add these to the pot and bring all to a boil. Immediately reduce to a simmer, beat gently with a long-handled whisk to release even more seeds from the pods and allow the syrup to simmer about two minutes. Let the syrup cool in the pan. Strain the larger pieces of vanilla pods and set aside, but leave in all the small black seeds in the syrup. Bottle and refrigerate.

Air-dry the pods and toss them into a bin of sugar to infuse it with the aroma of vanilla. Next time you make Rich Vanilla Syrup, use this vanilla-scented sugar.

* Using the term “simple syrup” is enough to raise voices among some bartenders and cocktail aficionados. “Simple” in this instance does not refer to a perfect one-to-one ratio of sugar to water. It means simply that the syrup contains no ingredients other than sugar and water. Bartenders had no special claim on the term which has, in fact, been used by pastry chefs, soda jerks, confectioners, and home cooks for a very long time. Each of these has different ideas about the correct proportion of sugar to water in “simple” syrup. Increasingly, you may hear of “rich” syrup when proportion of sugar is higher than that of water. This 2:1 rich syrup is the one we use almost exclusively at home. It’s just so simple.

The easiest way to make rich syrup is to add two parts sugar to one part water in a saucepan, heat only until the sugar dissolves, then cool and bottle. Store under refrigeration.

See the gift guide as it grows here.

.