Saturday, November 26, 2011

Moving Liquor Bottles? Use Plumbers' Tape

Moving date approaches. Despite our best efforts to drink down the liquor cabinets, we successfully killed off fewer than thirty bottles in the last few weeks. The remaining bottles — the unopened, the rare and unusual, the mostly-full — get packed and hauled to our new house.

Fortunately, the new place is less than a mile away. This means that I get to move bottles two different ways. One is quick and easy (but prone to spillage) and the other harkens back to my days as a risk-averse museum curator. It was in museums that I learned that something like 85% of damage occurs to objects while they’re in transit; you’ve got to guard against it carefully.

Getting ready for the move
The quick and easy bottle-moving method is simple. Load up milk crates, short bottles all together and tall bottles all together. Put them in the car, short bottle crates on the bottom, and drive — slowly, cautiously — to the new place. Unload. Repeat as necessary.

You can move a lot of liquor in a short time with this method but, unpadded, the bottles may break. If the crates tip or go sideways for any reason — a sudden stop, for instance — they may spill or leak contents, either because corks and screwcaps aren’t secured or because they’re defective. Old corks in particular may not provide the seal they seem to at a glance.

You could reuse empty liquor boxes from your local liquor store or friendly bartender the same way. The cardboard dividers add some protection against breaks — but liquids in transit, especially in partially-filled containers, like to slosh around, so there’s still the leakage issue.

That’s where Teflon or plumbers' tape comes in handy. Plumbers' tape is readily available at hardware stores and plumbing supply firms. We call it tape, but it’s really a thin film of polytetrafluoroethylene (PTFE) that doesn't have a sticky side like duct or masking tapes. It’s used in joints on plumbing projects to prevent leaks. Although it sticks to itself, it doesn’t stick to other surfaces — and that makes it ideal for sealing bottles.
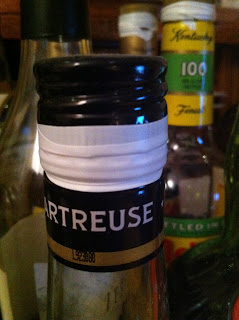
Sealed with plumbers' tape
I’ll be putting some of the bottles in cases and just hauling them over in the car. I’ll drive slowly on the side streets and not make any sudden stops. But movers are shifting the bulk of the liquor library, so those bottles won’t be in my control. That means I’ve got to pack them with the expectation that they will break and/or leak. Who knows? They might even load boxes sideways.

I’ll risk a great many things. But not when I don’t have to. I’m padding all the bottles, of course, but just as importantly, Teflon tape goes on each and every open bottle the movers are taking.

Overkill? Maybe. But as Vincent Vega can tell you, bad things sometimes happen in vehicles and a roll of tape costs less than a Royale with Cheese. Losing a single bottle seems unlikely, but it was a leaky bottle that caused this mess. A leaking bottle may dampen cardboard, causing it to rip. A ripped box could mean a few hundred dollars worth of liquor — some of it no longer produced — comes crashing to the sidewalk when a mover lifts it.

And that ain't gonna happen.

How to apply plumbers’ tape to a liquor bottle

Keep the bottle upright (liquor bottles should be stored upright, anyway). Make sure the cork or screwcap is sound, dry, and snugly in place. Pulling gently to stretch it just a bit, wrap the tape 2-4 times around the joint of the bottle’s cap and the glass neck or the lower part of a screwcap. Repeat as necessary on the remaining bottles.

To remove, simply peel it off carefully. Because the tape only adheres to itself, it’s unlikely to take off any ink, paper, or decorative embellishments.

Wednesday, November 23, 2011

Fastest Thanksgiving Shopping Ever

Home cooks and caterers know any number of tricks to sidestepping grocery crowds on the days leading up to Thanksgiving. They may, for instance, make sure all the staples are stocked well before the week of gluttony. They might get their goods delivered. Or they'll shop early in the morning while shelves are freshly stocked. But my favorite, no-fail method to get in and out of a market in the shortest time possible around Thanksgiving is less obvious. 

Shop where people don't celebrate Thanksgiving.


What the French toast? Who doesn't celebrate Turkey Day? That's downright anti-American...

Well, no. Not hardly.

In my rounds of San Diego food shopping, I hit several markets regularly that serve immigrant communities: Vietnamese, Chinese, Thai, North African, Polish, German, Korean, Middle Eastern, and more. Turns out, around here, anyway, that recent immigrants simply haven't quite gotten the hang of Thanksgiving yet. Especially if the regular clientele's native language isn't English, German, or some other European tongue, the fourth Thursday of November is these markets is just...Thursday.

And what better time than a weekday to slip into a store, grab a few things you need, and get on your way quickly? Parking is no problem and crowds are practically non-existent. Produce and spices in particular can be very cheap. Who knows? You might be inspired to make something you hadn't considered before.

I've already got everything we need for tomorrow. There will be punch, pie, and a huge pot of short rib chili. Not traditional, but, then, I've never been a stickler for tradition.

Caveat: don't rely on this scheme at Christmastime. Even non-Christians come out in force to shop and eat for that one.

Monday, November 21, 2011

Hot Damn, That’s My Jam

Hot pepper jellies and jams are household staples in huge swathes of the Southern and Southwestern United States. The ease with which these preserves are made accounts for some of their popularity, but the fact is that a whole lot of people find the piquant sweet-and-sour taste irresistible.

You can bet I'll be breaking some out this week for Thanksgiving.

Variations on the spicy agrodolce theme include thick raspberry and chipotle jam, jalapeno jam dyed green, quivering tequila-spiked jellies, peach preserves studded with habanero strips, and — inexplicably — jellies and jams no hotter than a bowl of celery sticks, but which their makers perversely refer to as “hot.” I’ve yet to sample an example made with the blistering ghost pepper, but it’s just a matter of time before some chilehead tempts death with infernal jelly on a cracker.

Of all these, my favorites are those that pack a noticeable capsaicin punch. In his 1987 cookbook, Southern Cooking, Craig Claiborne gives the recipe for an unfussy but suitably piquant jelly. He notes, rightly, that the peppers may be strained before the jelly sets in order to make clear jelly. Personally, I don’t see the point in that when most of this is going to be spread on top of soft white cheese for snacks. But, do as you will. Likewise, Claiborne calls for food coloring is an optional ingredient. I don’t find that my hot pepper jam needs it, but you do what your family likes.
Hot Pepper Jelly

1 cup cored and ground sweet red or green peppers, with the seeds
½ cup corn and ground long hot red or green peppers
6 ½ cups sugar
1 ½ cups white vinegar
¼ tsp salt, if desired
1 bottle (6 oz) fruit pectin
Red or green food coloring, optional

Combine the sweet peppers, hot peppers, sugar, vinegar, and salt in a saucepan. Simmer about 10 minutes, stirring occasionally.

Strain or not, as desired, and return mixture to the saucepan. If strained, the solids are good as a relish. Pour in the pectin and bring to the boil. Stir in the food coloring. Pour into sterilized half-pint jars and seal with paraffin. Store in a cool place.

YIELD: 8 TO 10 cups

Craig Claiborne (1987)
Southern Cooking
364 pages (hardback)
The New York Times Company
ISBN: 0812915992
$19.95

Friday, November 18, 2011

Call for Whiskey and Rum Papers — ADI's 9th Annual Spirits Conference

This coming April, Louisville will once again host the American Distilling Institute's annual spirits conference. From April 1-4 2012, craft distillers will gather to talk about the craft, business, and future of new American distilleries.


I have had the pleasure of speaking at the ADI conference (and of getting pulled onstage for another about how craft distillers can work with writers for exposure to larger audiences) and can say that it is a great time. I strongly encourage anyone to has something relevant to say about American craft distilling to submit a proposal. Note that accepted papers will be published online and authors may or may not be invited to speak at the conference itself.

Here's a bit called As Surely as Thunder Follows Lightning, my own topic at last year's ADI conference. Penn Jensen, vice president of ADI, gives the details on what they're looking for this time around:
The growth of Artisan Distilling over the past few years has been extraordinary. The obvious parallel is with Craft Brewing, itself a remarkable achievement. As so many people succeed, begin, or look to begin a career investment in Artisan Distilling, the personal relationships, communication channels, and open access to accurate information becomes ever more important.

The ADI Spirits Conference Theme, Whiskey & Rum, addresses virtually every issue along the critical path to creating a quality whiskey or rum product. The larger picture, inclusive of all spirits, addresses everything from permitting and financing, to marketing and distribution.

Our goal is to begin an Archive of Conference Proceedings that will serve as a resource to all our members seeking to avoid costly mis-steps, and to learn from the best. To that end, we are issuing this Call for Papers.

Topics:

Any seriously proposed topic relevant to the specific or general theme of the Conference is welcomed.

Deadline:

Your proposed topic should be sent to us no later than January 15, 2012. After that date, papers may be accepted for publication but may not be assured a presentation at the conference.

Review:

Technical papers will be peer-reviewed by experts in the specific field addressed.

Editing:

ADI reserves the right to edit for length and grammatical construction. Any substantive changes must be approved by the author(s).

Format:

Papers may be presented in either .doc, .docx, or .pps format

Publishing:

Unless specifically noted, all papers will be published online.

Eligibility:

You do not need to be a member of ADI to submit a paper or proposal for the conference.

Conference:

Submission of your paper does not enroll you as a member of ADI, or automatically admit you to the conference. If you intend to attend the conference, you must register online. If you are invited to attend, you will be notified regarding facilities and equipment available.

Please send you topic/proposal to:

Pennfield Jensen, ADI Vice President
3432 Valleyview Dr.
Bloomington, IN 47404
penn@distilling.com

Monday, November 14, 2011

A Whiskey Forge/Tales of the Cocktail Giveaway

Click to enlarge
Keeping an extensive culinary library in the house means that even when the power dies, I can still work on food and drink projects. The flip side is that paper takes up enormous amounts of space. There comes a point — for me, it's this week — when one needs to weigh wants against needs. See, I'm shifting in fits and starts to electronic versions of some of the library materials and I'm culling printed matter in advance of an upcoming move.

I need the material for work. I merely want it in physical form. But thousands of books, bits of ephemera, and vertical files just take up so much room, so after some judicious scanning, I'm giving some of it away.

The first thing I'm giving away — right here on this site — is a set of 4" x 6" recipe cards from 2008's Tales of the Cocktail.  To the best of my knowledge, it's a complete set of recipes for all the cocktails served over the five days of sessions, workshops, and panel discussions from that year. Almost 300 recipes. Among the cards are Martin Cate's rum-and-port concoction, the Dead Reckoning. From Pegu Club's Kenta Goto, there's a lovely Plymouth Gin-based La Fleur de Paradis (but note that the recipe calls for ½ ounce of Plymouth, not 12 — an issue we've seen before with genever) and an individual portion of Phil Ward's Mother's Ruin Punch in case you want to ruin any mothers this holiday season. 

This stack of recipe cards wasn't available to general attendees, but to presenters and media types. Even if you bought tickets to attend Tales sessions, chances are that you didn't end up with this particular bit of swag.

So how can you score this piece of cocktail history for yourself? Easy:
  1. Leave a comment below letting us know your favorite thing to drink. It can be booze-free or laced with alcohol — but it's got to be potable. Could be a cocktail, a homemade cordial, local beers, homemade bitters, whatever. Try to include a recipe; it's ok if you don't, but I like to know what you all are drinking. Include your Twitter account name so I can find you.
  2. Follow me on Twitter
What's the Catch?
There is no catch. Just follow me on Twitter and let us know about your favorite drinks. You don't have to tweet or re-tweet anything. There's no Official Entry Form, you don't have to do anything about me on Facebook, and you don't have to buy my book. This is just us getting to know each other better.

On November 30th, my lovely assistant will pick a winner at random. Because the person to whom I'm giving this set of cards is following my Twitter account, I'll send a message there for a shipping address. If I hear nothing in two days, it goes to the next random commenter. And so on until we have a winner.

"But, Rowley," you may worry. "I'm in Australia. Are you seriously telling me you'll ship it all the way here if I win?" Hell, yes, mate. None of this offer-only-good-in-the-lower-48-states nonsense. I have a few thousand regular Aussie readers — why would I exclude any of you? Same goes for readers in Germany, France, Holland, Thailand, Brazil, Canada, Morocco, or even far away and fabled Kansas. Anywhere. Now, if alcohol is taboo where you live or censors frown on foreign media, the package may never make it past customs agents. That I can't do anything about. In that case, it's just lost.

Thursday, November 10, 2011

Candied Buddha's Hand Citron

Drinking down the liquor cabinets continues. Frankly, our goal is not to drink away the hooch entirely, but to kill off the heels — those few ounces sloshing around nearly empty bottles — so that we don't schlep a lot of heavy glass to the new digs. You'd think, given the imperative to jettison dead weight, that I would refrain as well from canning, pickling, preserving, making ice cream, and like that.

You'd be right. Well, mostly. Old habits die hard.

When I stumbled across a stash of the bizarre Buddha's hand citron last week, though, I seized on the opportunity to crank out one last batch. Unlike citrus fruit with which we are most familiar, Buddha's hand citron is not even vaguely spherical. It has color you'd expect in a lemon, but the shape is more like a cuttlefish or squid. Those with a penchant for old horror stories might find it resembles the tentacled head of HP Lovecraft's monstrous Cthulhu rather than the hand of anyone, but there you go.

Known more properly as Citrus medica, the Buddha's hand or fingered citron, is striking not just for its bizarre appearance, but its strongly fragrant zest. Unlike the pith of lemons, grapefruit, or oranges which can add a distinct bitterness some dishes, this variety is edible pretty much as-is.

But it also takes to candying very well and, since plum pudding season approaches, I wanted a stash of candied citron so that if I catch a wild hare and decide to make plum puddings this year, I'll have the  most elusive ingredient. It will also undoubtedly find its way into breakfast scones and accompany the occasional afternoon tea.

I started with 2 pounds of fruit but the directions below are easily adaptable for whatever amount you may have. Don't be surprised if you don't find any pulp inside. In fact, there probably won't be any at all. If you do happen to find some, simply slice away for this recipe.

Candied Buddha's Hand Citron

One large or two small Buddha's hand citron (about 2lb/1k)
sugar (about 6.75 cups)
water (about 3 cups)

Wash the fruit well, trim any greenish or brown spots, and cut into half-inch cubes — including all of the pith and all of the zest. Place them in a large pot and cover with cold water. Bring the water to a boil, reduce to a simmer, and cook about 30 to 45 minutes until the cubes become translucent. Drain the blanched fruit and return it to the pot.

Add 2 ¼ cups of sugar and 1 cup of water. Repeat until the cubes are completely submerged.* Bring the mixture to a boil over high heat, then reduce it to a low simmer. Cook, without stirring, about one hour. You're looking again for translucency. Turn off the heat and let the poached citron cubes remain in the syrup covered overnight until cool.

The next day, strain them from the syrup (don't throw out the syrup) and arrange on a cookie rack set over a lipped tray to catch any syrup that drains from the pieces. Allow to dry at room temperature for 2 to 3 days until the pieces are dry to the touch. Toss them with granulated sugar and seal in an airtight container.
Notes:

*For 2 pounds of diced fruit, I used 6 ¾ cup of sugar and 3 cups of water.

You can, if you want to speed the drying a bit, train a fan on the candied cubes. Do avoid drying them, however, in the oven since this may result in something more leathery than tender and supple.

I haven't yet decided what I want to do with it (except, obviously in, cocktails and perhaps desserts) but this recipe yields about 5 cups of fragrant citron syrup. Gingered citron lemonade is as good a place to start as any...

Monday, November 7, 2011

Kill the Open Bottles

As a freelancer, it's important for me to wrest as much value from the things around me as possible. In that vein, I keep a number of "yard work" shirts. They have frayed collars, bleach stains, little rips and tears — flaws that make them unsuitable for wearing to client meetings, but just right while raking leaves, trimming hedges, painting, etc. Old jeans serve the same purpose. The truth is, though, that I haven't had a yard in fifteen years.

That's not thrifty; that's hoarding.

But not this week. This week, I'm culling possessions ruthlessly.

We're in the midst of closing on a nearly 100-year old Craftsman home just off Balboa Park in San Diego's North Park neighborhood. I've already weeded the clothes. Today, I start pulling books I no longer use and boxing the library in earnest. Before the week is out, I'll turn that gimlet eye on the offsite storage unit.

But during the entire time, we're shifting how we use the liquor library. When we drink at home, we usually decide what we feel like, then simply gather bottles and start mixing. With several hundred open bottles at home, nearly any cocktail is possible, except for the most outlandish concoctions of modern molecular cocktology (or whatever it's called). The kind of drinking has to go on hold for now. Until we're settled in this place, the simple new rule for any bottle of spirits is:
Kill the open bottles.
We'll start with those holding just a few ounces of booze and then move on to more full bottles. I know we won't be able to drink it all, even with the help of friends, but I'm not moving frayed, torn old shirts — and I'll be damned if I'm moving heavy glass bottles with next to nothing in them.

 Goes well with:

Friday, November 4, 2011

Root Beer Cake

Root beer cake. Yeah, I know. Sounds like something Ernest Matthew Mickler would've praised. But I stumbled across a recipe for just such a thing while reading Andrew Carmellini's new book American Flavor and it struck a nostalgic chord. I've also been on soda and baking kicks lately as well as preparing to move (we bought a house this week), so anything that reduces the number of cans, bottles, and boxes from the kitchen larder or the liquor closets get boosted to the top of the to-cook, -drink, -make list.

When I said I'd made a root beer cake, the looks at home could only be described as nonplussed. If  I had described it as a dark spice cake or a moist cousin of German lebkuchen, the initial response might've been more enthusiastic. Turns out that the cake is very much like a spice cake, spiked with star anise, cardamom, nutmeg, lemons, and pepper. The top is covered with with spiced glaze flavored with some of the same spices.

Like a spice cake, it gets better on the second day. And the third. I'd make this for kids and to bring along on picnics, but, man, the doughnut potential here is so, so tempting.

A word of warning; the batter is very liquid. You might think something is amiss (especially since the measurements for the cake are odd). Not to worry; it comes out just fine.

From Andrew Carmellini's American Flavor, here's...

Root Beer Cake

The Cake

1 tablespoon unsalted butter, at room temperature, for the pan
1.5 cups plus 1 Tbl all-purpose flour
One 12-ounce bottle (1.5 cups) root beer
½ cup molasses
½ tsp plus 1/8 tsp baking soda
¾ cup dark brown sugar
¼ cup plus 2 Tbl vegetable oil
3 tablespoons plus 1 teaspoon granulated sugar
One 1-inch piece of fresh ginger, peeled and grated on a microplane or on the finest side of a box grater (1 tsp)
2 tsp vanilla extract
1 large egg
1 ¾ tsp baking powder
1 ¼ tsp ground star anise
1 ½ tsp ground cardamom
½ whole nutmeg, grated (or 2 tsp ground nutmeg)
Finely grated zest of 2 lemons
1 tsp kosher salt
½ tsp fresh-ground black pepper

The Root Beer Glaze
¾ cup heavy cream
1 Tbl sassafras bark (or ½ tsp sassafras extract; see Note)
2 cups powdered sugar
Pinch of ground star anise
Pinch of ground cardamom
¼ tsp kosher salt
¼ whole nutmeg, grated (or about 1 tsp ground nutmeg)
Finely grated zest of ½ lemon


To Make the Cake

Preheat the oven to 350°F.

Grease the bottom and sides of a 10-inch cake pan with some of the butter.

Cut out a piece of parchment paper so it fits closely into the bottom of the cake pan. Line the bottom of the pan with the parchment, and then grease the parchment with more butter.

Shake 1 tablespoon of the flour into the cake pan, and shake it around so it sticks to the butter. Tap out any excess flour that doesn't stick to the parchment or to the sides of the pan.

Pour the root beer and molasses into a deep medium-sized pot, and bring the mixture to a boil over high heat. (You need those high sides because the baking soda will froth up very high, and you don't want it to spill over! So make sure there's some meaningful space between the liquid and the top of the pot.)

Pull the pot off the heat and whisk in all the baking soda, so it froths up. Then put the pot right in the fridge to cool down a little.

While the root beer mix is cooling down, whisk the brown sugar, vegetable oil, granulated sugar, ginger, and vanilla extract together in a mixing bowl. The mixture will be a little chunky at this point.

Crack the egg into the bowl and whisk well. The egg is what makes everything come together smoothly: you should have a thick paste. Set this aside.

In another mixing bowl, combine rest of the flour with the baking powder, star anise, and cardamom. Grate in the nutmeg and lemon zest, and add the salt and pepper. Whisk everything together so it's well combined. Take the root beer mixture out of the fridge. Pour a third of the flour mixture into a large mixing bowl; pour in one-third of the root beer mixture, then one-third of the sugar paste. Whisk everything together slowly (so it doesn't splash everywhere), and then add another one-third of the flour, another one-third of the root beer, and so forth, until everything is combined in the bowl. (The mix doesn't need to be completely and smoothly combined until the last of the wet and dry mixtures are in the bowl.) You should have wet, almost liquid batter.

Pour the batter into the cake pan, put the pan on a cookie sheet (to catch drips and splashes), and put on the middle oven rack.

Bake the cake for 45 minutes without opening the oven at all (this cake will sink if you shake it up while it's baking). Check it: the cake should be high and dark brown, with a little bit of spring-back when you touch it (but not too much-it's a very moist cake), if it's not quite ready, rotate the pan and put it back in the oven for another 5 minutes before checking it again. The whole baking process shouldn't take longer than 55 minutes, even in a slow oven.

While the Cake is Baking, Make the Glaze

Whisk the cream and sassafras together in a small pot, and bring it up to a boil over medium-high heat. As soon as it boils, pull the mixture off the heat, pour it into a glass or ceramic container (something that won't crack from the heat), and put it in the fridge. Let the mixture cool for about 30 minutes while the sassafras steeps into the cream, so you have a nice root beer flavor.

In a mixing bowl, combine the powdered sugar, star anise, cardamom, and salt. Grate in the nutmeg and lemon zest, and whisk everything together.

Strain the cooled cream through a fine-mesh strain into a small mixing bowl (so the sassafras pieces don’t end up in the glaze).

Gently whisk ½ cup of the cream into the powdered sugar mixture, holding back the last 2 tablespoons see if you need it. If the mixture is dry and not coming together as a glaze, add more cream. Whisk the mixture well, until you have a shiny, thick liquid.

To Finish the Cake

When the cake is ready, pull it out of the oven and let it rest for about 5 minutes.

Flip the cake out of the pan onto a serving plate. Spread the glaze thickly on top of the warm cake with a spoon. The glaze will melt and drip down the sides as you slather it on.

You can serve the cake as soon as it's cooled to room temperature-but like all spice cakes, it's even better the day after you make it. Store it covered at room temperature.


Andrew Carmellini (2011)
American Flavor
336 pages (hardback)
Ecco
ISBN: 0061963291
$34.99

Goes well with:
  • Drinking Cheerwine Like It's My Job. Root beer's all well and good, but I swear that there will come a day when a Cheerwine cake will cool on our kitchen counter. 
  • My review of Andrew Schloss' new book Homemade Soda — and how my mom came to think there was a drive-by shooting in her dining room.
  • My take on Brad Thomas Parsons' new book Bitters. It's because I make my own bitters, infusions, and extracts that I happened to have everything on the ingredient list for this cake.

Thursday, November 3, 2011

Tiki Cannibal Carnage for TDN: Nuku Hiva

Thursday Drink Night happens, more or less, once a week on...um, lemme check. Yep. Thursday. Celebrants sometimes gather in person, but it's more of an online deal in which cocktail bloggers, spirits writers, bartenders, and drinks enthusiasts fire up their computers, chat with each other, and mix cocktails based on a theme or a particular spirit. This week, the theme is tiki...with a twist.

From the Mixoloseum blog regarding tonight's Thursday Drink Night:

[The] theme will be “Nuku Hiva” based on recent events on that tropical Polynesian island. A little back story:
In early October, the charred remains of a German adventurer were discovered at a campfire site on a South Pacific island. The tabloid media were quick to portray the slaying as a possible case of cannibalism on Nuku Hiva, an island historically known for human sacrifice. But locals are offended and experts say such killings are a thing of the very distant past. (read more)
Therefore, in honor of this darkly exotic mystery, the goal of the night is to create tiki drinks with at least one German ingredient! Bonus if you use fire!  Stop in to the chatroom after 8pm EST for all the fun and frivolity.

Now, what's a German ingredient? Kirsch? Yes. Bärenjäger? Yes. Jägermeister? Yes. Jägertee? Sure. Speckklöße? Not so fast...

Goes well with:
  • A bit I wrote a few years ago on Santa Maria tri-tip, bringing together The Smiths, Mr Gay UK, a taste for human flesh, and the inestimable Jeffery Jones in the 1999 film Ravenous. 
  • On Licking a Human Skull. I have, certainly. What? You haven't? Savage. 

Wednesday, November 2, 2011

Bookshelf: Homemade Soda

Around the time I started brewing my own stouts, ales, lagers, and "wee heavies," my father mentioned his fond memories of making root beer as a kid before World War II. During a subsequent school break, I scrounged up a few cases of empty bottles and pulled together ingredients to make an extract batch good old-fashioned American root beer with him. It was my first batch of home-brewed soda and the project taught me some early lessons in how not to work with yeast.

When the bottles began exploding in my parents’ dining room, my mother — then a schoolteacher — mistook the sounds of shattering glass for a drive-by shooting. Her students, she thought, had finally found her.

Mom was rattled, but unharmed. Over the years, I’ve collaborated on a number of undertakings with my father, from baking onion rye bread to laying bricks and building a deck, but that stab at root beer was our last joint beverage project.

The promise of homemade sodas occasionally came back to pluck at the edges of my imagination over the next few years and I ended up acquiring a decent collection of materials about the history and how-to of soda making. One of my favorites is Homemade Soda, a new-ish recipe collection by serial author Andrew Schloss. Not only does he have multiple root beer recipes, he gives various ways to prepare and then carbonate syrup bases; mixing with seltzer, carbonating with a siphon, or even — if you want to try your hand at it — brewing and lightly fermenting.

Schloss includes recipes for honey cardamom fizzy water, blazing inferno chile water, caramel seltzer, black lemonade, maraschino ginger ale, the “original” Orange Crush, homemade tonics, sarsaparilla, birch beer, spruce beer, various cream sodas, chai fizz, sparkling lemongrass lemonade, and an entire chapter devoted to shrubs, switchels, and other vinegar drinks.

The cocktail applications — both for the base syrups and the carbonated final product — hold a lot of promise. Regardless of whether you get all boozy with this or intend to use it as inspiration for treats for the kids, the historical asides, directions on equipment and processes, and light tone make Homemade Soda an easy and enjoyable read.

Goes well with:
  • Fix the Pumps, Darcy O’Neil’s compendium of old soda fountain syrups and tinctures recipes. 
Andrew Schloss (2011)
Homemade Soda: 200 Recipes for Making & Using Fruit Sodas & Fizzy Juices; Sparkling Waters; Root Beers & Cola Brews; Herbal & Healing Waters; Sparkling Teas and Coffees; Shrubs and Switchels; Cream Sodas and Floats; and Other Carbonated Concoctions
336 pages (paperback)
Storey Publishing
ISBN: 1603427961
$18.95

Tuesday, November 1, 2011

Champurrado for Day of the Dead

One night, when we were still new in San Diego, Dr. Morpheus and I attended a neighborhood party commemorating Día de los Muertos. We live about 20 minutes outside Tijuana; this is a very local tradition. Friends had spent days preparing mole, forming tamales, and doing the other prep work for the feast of traditional Mexican foods.

As we chatted with neighbors, Morpheus suddenly told me “I’ll be right back. Want some hot chocolate?”

“Sure,” I said.

Then I saw that he was headed to a huge, cylindrical Rubbermaid cooler. Guests were coming away from it with cups of steaming drinks. “Wait...” Even from across the room, I could smell what flowing from the cooler’s tap. But he was already gone. When he returned a few minutes later, he handed me a cup. He still hadn’t tried his.

“Don’t drink that,” I warned him. “You won’t like it.”

“It’s hot chocolate,” he explained as if I were an imbecile.

“That’s not all it is. Try it. It’s not something you’re going to go for, though.” We’ve known each other nearly twenty years; I know what the boy likes to put in his mouth. The look of surprise that leapt to his face at the first sip was pretty much what I expected.

“What the hell is that?”

That was champurrado, a subspecies of corn-thickened beverages common to Mexico known as atoles. Atoles can be plain or flavored with pineapple, peach, cinnamon, pumpkin, coconut, guavas, sweet potatoes, plums, peas, mangos, strawberries, sunflower seeds, and, quite literally, hundreds more fruits, spices, vegetables, and seeds.

Champurrado, one of my favorite varieties of atole, is flavored with canela (Mexican cinnamon) and chocolate. At a glance, it does look like hot chocolate, but if you’ve spent any time around corn (ahem), you can pick out the aroma well before tasting it. And if the aroma doesn’t give it away, the consistency certainly does.

An acquired taste? Yeah, sure, I'll grant you that. An acquired texture is more like it, though. Sometimes, it's almost pudding-like, but in general, champurrado isn’t thick like oatmeal or Cream of Wheat cereal. But even the smallest sip reveals it’s thicker than hot chocolate. More like a cream of tomato or pumpkin soup. Use masa if you’ve got it, but the corn that’s most commonly added around here is masa harina, a finely ground dry cornmeal used to prepare tamales and some kinds of tortillas. It’s first mixed with water to make a loose slurry, then added to the chocolate mix, the whole thing then heated a few minutes; if you add the masa harina all at once, the stuff clumps up like cornstarch.

Aficionados are split on whether to use all water, all milk, or some combination of the two, but here’s how we do it when Autumn sets in and the mornings are so chilly. This makes a moderately thick champurrado. If you like it thinner, simply add more water or milk to the pan while heating.

I've got the champurrado covered for tonight; who's making the mole?
Champurrado

One 3 ¼ oz disc of Mexican chocolate (Ibarra brand)
One 5-6” stick canela (Mexican cinnamon) or 3-4” regular cinnamon
2 ½ cups water (divided use)
1 cup milk
½ cup masa harina
1 small cone of piloncillo* (or ¼ to ½ cup turbinado or brown sugar)

Bring 1 ½ cups of water to the boil in a saucepan. In a separate mixing bowl (or the measuring cup if it’s large enough), mix together the remaining 1 cup of water with the milk and the masa harina. Stir together until it reaches a smooth, uniform consistency.

When the water comes to a bowl, stir the masa mixture again to loosen it. Pour it into the boiling water along with the chocolate, piloncillo and cinnamon. Reduce the heat and simmer for 10-15 minutes, until the chocolate and sugar have dissolved and the canela flavor has suffused the entire mixture.

Serve in squat mugs (to better hold the heat).

* Piloncillo is the small, very hard sugar that comes in cones/pylons and is available at almost every Mexican market. We've used it here before in our pineapple vinegar.